Occaselle / The Journal
How to Make a Wedding Website: A step-by-step guide

From choosing your design to collecting RSVPs, follow seven steps to create a wedding website that feels like you.
Planning a wedding comes with plenty of details to organize, from ceremony locations and accommodation recommendations to guest lists and RSVPs. A wedding website brings all that information together in one place, making it easier for guests to find what they need as your celebration approaches.
The good news? You don't need design experience or coding skills to create one. Whether you choose a free wedding website builder or a more personalized design, you can create a beautiful, practical space that reflects your celebration.
In this guide, we'll walk through seven steps to create your wedding website, from choosing the right platform to sharing the finished site with your guests.
Step 1: Choose a Wedding Website Platform
Before choosing colors, uploading engagement photos, or writing your story, you'll need to decide where to create your wedding website.
There are several ways to build one, and the right choice depends on your priorities, budget, and how much customization you'd like.
Free wedding website platforms are a popular starting point. Many offer wedding-specific templates and planning features, including online RSVPs and guest information. They can be a practical choice for couples who want to keep costs low and manage several parts of their wedding in one place.
General website builders offer broader design flexibility and tools for creating different type of websites. They're worth considering if you enjoy designing your own pages, although some features and customizations may require additional setup or a paid plan.
Paid wedding website services offer another option for couples who prefer a curated design or a particular purchasing experience. Depending on the provider, these may include customizable templates, built-in guest management, and hosting for a defined period.
What should you look for in a wedding website platform?
Before making your choice, consider a few questions:
Design: Do the available templates reflect the atmosphere and style of your wedding?
Customization: Can you personalize the colors, typography, photos, and content to make the website feel like yours?
Guest management: Does the platform support online RSVPs, plus-ones, and the events you're inviting guests to attend?
Ease of use: Can you comfortably update the website as your plans change?
Mobile experience: Will guests be able to find important information easily on their phones?
Privacy: Can you control access to guest information or certain wedding details?
Pricing: Is the website free, a one-time purchase, or recurring subscription? Are hosting, custom domains, or additional features charged separately?
There's no single platform that's right for every couple. A free website may provide everything you need, while a paid option may be worthwhile if you prefer its design, customization options, or overall experience.
The goal is to choose a platform that fits your wedding–not to pay for features you won't use.
Step 2: Choose a Design That Reflects Your Wedding Style
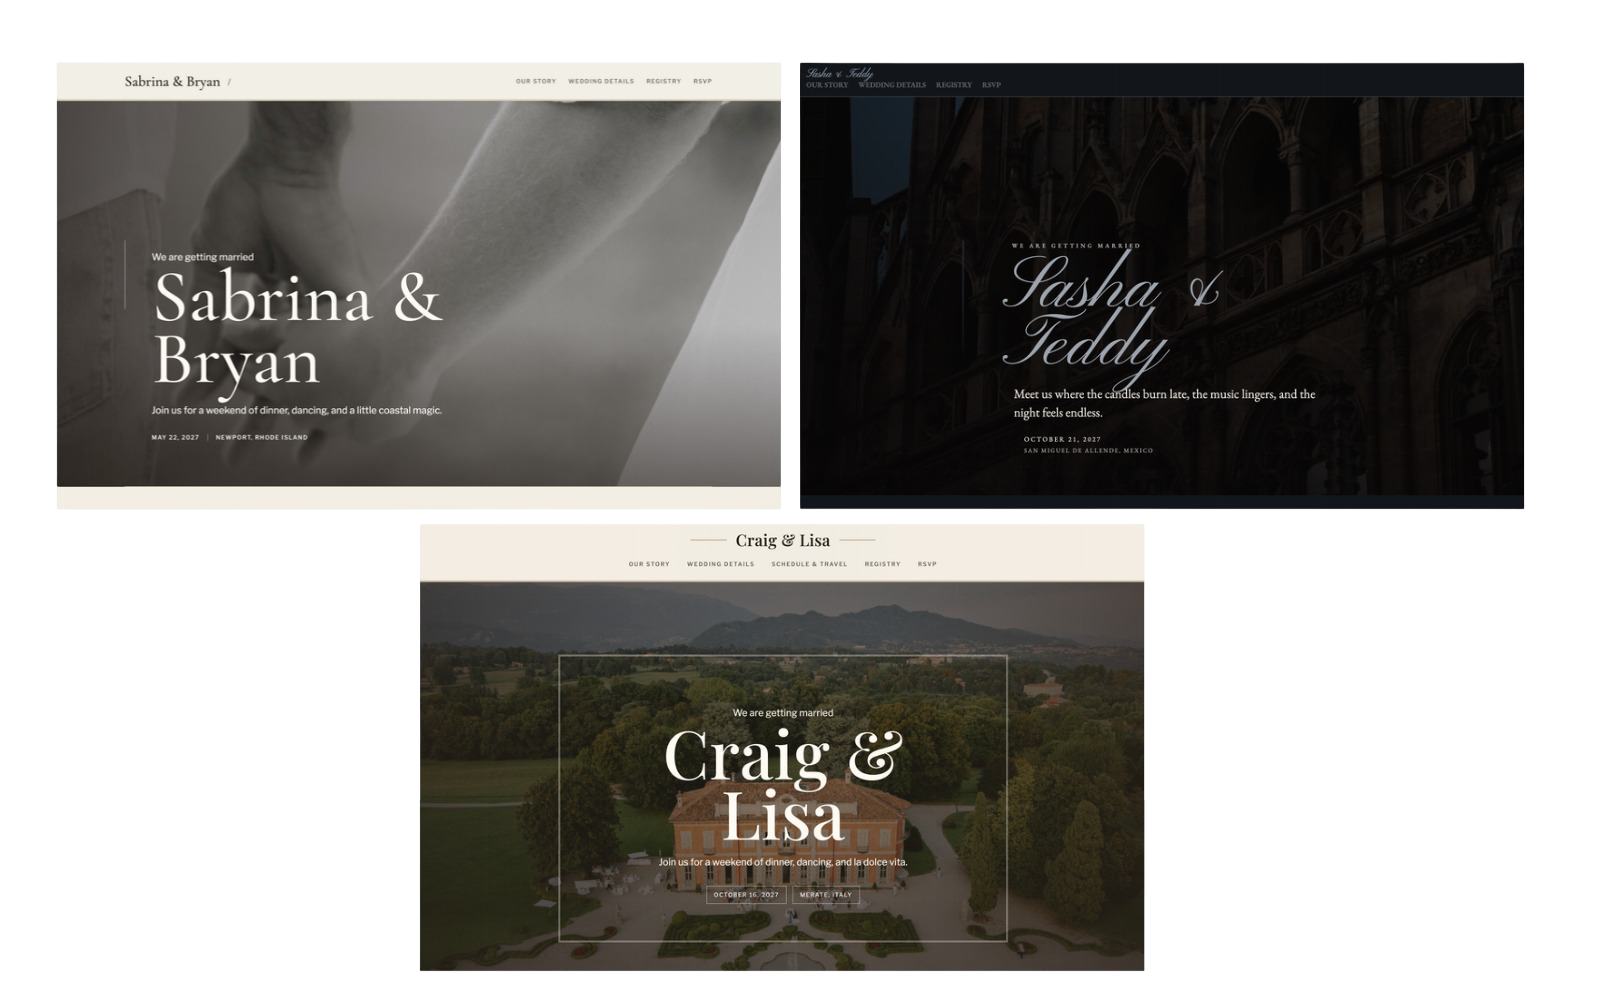
Your wedding website is often one of the first glimpses guests will have of your celebration. Its design can introduce the atmosphere you're creating, whether that's a romantic garden wedding, an intimate countryside gathering, or an elegant black-tie affair.
Start by thinking about the overall feeling you want your wedding to convey. Do you envision something timeless and understated, soft and romantic, or modern and sophisticated? Your website doesn't need to match every detail of your wedding, but it should feel like a natural extension of it.
Consider Your Colors and Font
If you've already chosen your wedding colors, incorporating them into your website is a simple way to create a cohesive look.
For a classic aesthetic, consider neutral tones paired with elegant serif fonts. Soft pastels and delicate font can complement a romantic celebration, while deeper colors and clean lettering can create a more contemporary feel.
Try to keep your palette and font choices consistent throughout the website. A thoughtful combination of two or three colors and complementary fonts is often more effective than using too many styles at once.
Choose Photos That Feel Personal
Engagement portraits, candid moments, or a favorite photograph together can make your wedding website feel more personal.
Choose images that complement your design without overwhelming the page. A single meaningful photograph can make just as much of an impression as an elaborate gallery.
If you're still waiting for your engagement photos, don't worry. You can begin designing your website and add your photographs later.
Keeping the Guest Experience in Mind
While the design should reflect your personality, your guests should still be able to find important information easily.
Choose readable fonts, maintain enough contrast between text and backgrounds, and keep navigation simple. Remember that many guests will view your website on their phones, so a beautiful design should also be comfortable to use on a smaller screen.
Ultimately, the best wedding website design is one that feels true to your celebration while making your guests feel welcomed and informed.
Step 3: Add Your Essential Wedding Details
Once you've chosen your design, it's time to fill your wedding website with the information your guests will need.
Think of your website as a central place for everything related to your celebration. Instead of answering the same questions individually, you can direct guests to one place for important dates, locations, and updates.
Start With the Date and Location
Your names, wedding date, and ceremony location are the foundation of your website.
As your plans become more specific, include the ceremony start time, reception location, and any additional events guests are invited to attend.
If your ceremony and reception are at different venues, make that distinction clear. Including full addresses can also help guests plan their travel and arrive at the correct location.
Include Dress Code and Travel information
Guests appreciate knowing what to expect before the wedding day.
If you've chosen a dress code, such as black tie, cocktail attire, or garden formal, include it alongside any helpful guidance about the venue or setting.
For guests traveling from out of town, consider adding nearby accommodations, hotel room block information, transportation options, and parking details.
You don't need to provide an exhaustive travel guide. Focus on the information that will make attending your wedding easier.
Add Your Registry and Other Helpful Details
If you've created a wedding registry, your website is a convenient place to share it with guests.
You can also include a frequently asked questions section to address details such as whether children are invited, if the celebration will be indoors or outdoors, or whom guests should contact with questions.
Keep your information organized into clear sections so guests can find what they're looking for without searching through long paragraphs.
Step 4: Tell Your Story and Personalize Your Website
Beyond the dates and details, your wedding website is an opportunity to share a little of what makes your relationship special.
Whether you've been together for two years or ten, the personal touches you include can make your website feel like more than a collection of wedding information. They give guests a glimpse into the people and memories behind the celebration.
Share Your Story
Some couples enjoy sharing how they met, their favorite memories together, or the story of their engagement. Others prefer a simple introduction or a heartfelt message welcoming guests to their wedding.
There's no right way to tell your story, and it doesn't need to be long or elaborate.
A few thoughtful sentences can be just as meaningful as a detailed account of your relationship. Write in a way that feels natural to you, whether that's romantic, playful, sentimental, or somewhere in between.
Add Meaningful Photos
Photographs can bring warmth and personality to your website.
Consider including engagement portraits, favorite travel memories, or candid moments that capture your relationship. You don't need a professional photoshoot or an extensive gallery to create something beautiful.
Choose a few images that you genuinely love and let them complement the overall design of your website.
Make it Feel Like Yours
Small details can make your wedding website feel personal.
A favorite quote, a meaningful welcome message, or a short note about what you're most looking forward to can help set the tone for your celebration.
You can also carry elements of your wedding's style into the website, create a consistent feeling between your online presence, invitations, and wedding day.
Most importantly, don't feel pressured to share more than you're comfortable with. Your wedding website should reflect your relationship in a way that feels authentic to both of you.
The goal isn't to tell the perfect love story. It's to create a space that feels unmistakably yours.
Step 5: Set Up Your Online RSVP System
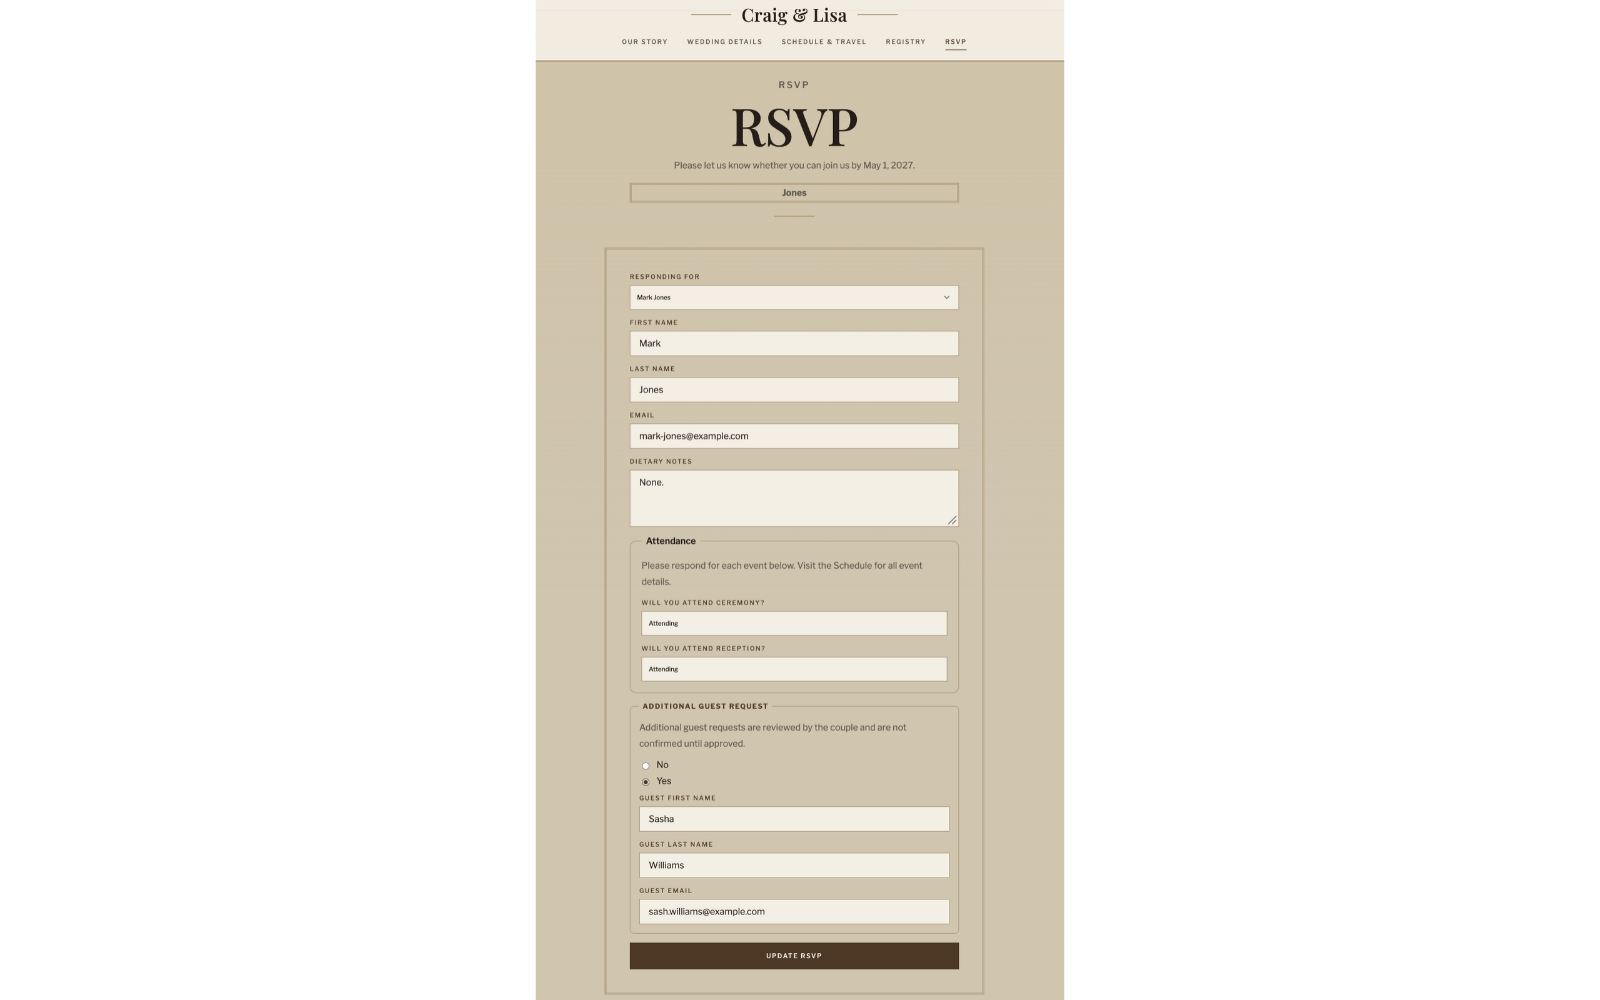
Once your wedding details are in place, it's time to make it easy for guests to respond to their invitations.
An online RSVP system allows guests to confirm their attendance directly through your wedding website, helping you keep track of responses without managing endless messages or paper reply cards.
But collecting a simple yes or no is only part of the process. A little planning can make managing your guest list much easier as your wedding day approaches.
Choose an RSVP Deadline
Give your guests enough time to respond while leaving yourself room to finalize arrangements with your venue and vendors.
Many couples set their RSVP deadline approximately three to four weeks before the wedding, although your venue or caterer may need final guests counts earlier.
Before choosing a date, confirm when your vendors need their final numbers and allow yourself a little extra time to follow up with guests who haven't responded.
Decide What Information to Collect
Think about what you'll need to know from each guest before setting up your RSVP form.
Along with attendance, you may want to collect meal selections, dietary restrictions, or responses to additional wedding events.
If you're allowing plus-ones, make sure your invitation and RSVP process clearly communicate who is invited. The same applies to children and other household members.
Keeping these details organized from the beginning can save you considerable time later.
Organize Your Guest List by Household and Event
For couples inviting families or multiple people from the same household, grouping guests together can simplify the RSVP experience.
You may also be planning events beyond the ceremony and reception, such as a rehearsal dinner or farewell brunch. Not every guest will necessarily be invited to every event.
A guest management system that supports household invitations and event-specific guest list can help you organize these details without creating separate RSVP processes for every celebration.
Make RSVP Management Easier With Occaselle
Occaselle combines wedding website design with built-in RSVP and guest management tools, allowing couples to manage invitations and responses in one place.
With household-based guest lists and event-specific invitations, you can organize who is invited to each part of your celebration while giving guests a convenient way to respond online.
Rather than juggling separate spreadsheets and forms, you can keep your wedding details and guest responses connected through your website.
The goal is simple: make responding easy for your guests and managing those responses easier for you.
Step 6: Preview Your Wedding Website Before Sharing It
You've chosen your design, added your wedding details, and personalized your website. Before sharing it with your guests, take a few moments to see everything from their perspective.
This is your opportunity to make sure website looks the way you imagined and that guests can easily find the information they need.
Take a Look on Your Phone
Many guests will open your wedding website from a text message, email, or invitation QR code, so it's worth seeing how everything looks on a smaller screen.
Check that your photos display nicely, the text is easy to read, and the navigation feels simple. You shouldn't have to zoom in or search around to find important details.
If possible, ask your partner or someone you trust to take a look, too. A fresh perspective can help you notice things you might have overlooked.
Double-Check Your Wedding Details
Read through your website as though you're a guest attending the wedding for the first time.
Are the ceremony and reception times correct? Have you included the right venue addresses? Are your dress code, travel information, and RSVP deadline clearly stated?
Take a moment to open any links you've included, such as hotel accommodations, directions, or your wedding registry, to make sure they lead to the right places.
Try the RSVP Experience
If your website includes online RSVPs, walk through the process before inviting guests to respond.
Make sure the RSVP instructions are clear, the questions make sense, and guests can submit their response without confusion.
If you're inviting different households or groups to separate events, check that the invitation details are displayed as intended.
A few minutes spent previewing your website can help prevent unnecessary questions later and give you confidence when it's time to share it.
And once everything feels right, you're ready for one of the most exciting parts: inviting your guests into the celebration.
Step 7: Publish and Share Your Wedding Website
Your wedding website is ready, and now comes the exciting part: sharing it with the people who will celebrate alongside you.
Whether you're planning an intimate gathering or a grand celebration, your website gives guests one convenient place to find the details they need as your wedding day approaches.
When Should You Share Your Wedding Website?
Ideally, your wedding website should be available when you begin sending save-the-dates, especially if guests will need to arrange travel or accommodations.
For many weddings, save-the-dates are sent approximately six to eight months in advance, while destination weddings may benefit from even earlier notice.
Don't worry if every detail isn't finalized. You can share the essentials first, such as your date and location, and add more information as your plans come together.
Just make sure any details you share are accurate, particularly information guests may use to make travel arrangements.
Include Your Website on Invitations and Save-the-Dates
One of the easiest ways to share your wedding website is by including its address on your save-the-dates or invitations.
You can print the website link directly on your stationery or include a QR code that guests can scan with their phones.
If you're using a QR code, test it before printing to make sure it opens the correct website.
You can also share your website through personal messages or emails, particularly with guests who may appreciate having a clickable link.
Keep Your Guests Informed
As your wedding plans develop, your website can remain a helpful source of information.
If you confirm hotel accommodations, update transportation details, or add information about additional events, make sure those changes appear on your website.
For important updates, consider contacting affected guests directly rather than assuming everyone will revisit the website on their own.
Keep your information current helps guests feel prepared and reduces the need to answer the same questions repeatedly.
Enjoy the Moment
Once your website is shared, take a moment to appreciate what you've created.
It's more than a collection of dates, addresses, and RSVP forms. It's a reflection of your celebration and a welcoming place for the people who will be part of it.
You've created something that brings your wedding details, your story, and your guests together in one place. Now you can focus on enjoying the moments leading up to your special day.
Frequently Asked Questions
When should you create your wedding website?
It's a good idea to create your wedding website once you've confirmed your wedding date and location, ideally before sending your save-the-dates.
Many couples begin creating their websites six to eight months before the wedding, while those planning destination celebrations may want to start earlier.
You don't need every detail finalized to get started. Your website can grow alongside your wedding plans.
What should a wedding website include?
At minimum, your wedding website should include your names, wedding date, ceremony and reception locations, and important timing information.
You may also want to include an RSVP form, dress code, accommodation recommendations, transportation details, and registry links.
Personal touches, such as engagement photos or your love story, can make the website feel even more special.
Can you make a wedding website without coding?
Absolutely! Most wedding website platforms offer ready-made templates and customization tools, allowing you to create a website without writing any code.
You can typically personalize the design, add your information, upload photos, and manage your website through an online editor.
Should your wedding website be private?
That depends on your preferences and the information you're sharing.
Some couples are comfortable having a publicly accessible website, while others prefer to limit access to certain details.
If privacy is important to you, look for a platform that offers appropriate access controls. You may also want to avoid publishing sensitive information, such as personal phone numbers or private guest details, on publicly accessible pages.
How much does a wedding website cost?
Wedding websites can range from free to several hundred dollars, depending on the platform, design, and included features.
Some services offer free templates, while others charge a one-time fee or a recurring subscription. Additional costs may apply for custom domains, premium designs, or extra functionality.
Before choosing a platform, review what's included in the price, how long your website will remain available, and whether you'll need to pay for hosting or renewal.
The best option is one that fits both your wedding needs and your budget.
Make Your Wedding Website Your Own
Your wedding website should feel personal, welcoming, and easy for guests to use.
Ready to create your own wedding website?
Explore Occaselle's thoughtfully designed templates, with customizable details, built-in RSVP management, and two years of hosting included in a one-time purchase.
Find a design that feels like yours.